Build Your Personal Blog with Jekyll in Docker on Windows
Tech Blog on GitHub Pages
Creating a personal blog with Jekyll is an excellent choice for developers who want a lightweight, static site hosted on GitHub Pages. However, managing Ruby dependencies can be tricky, especially on Windows. Using Docker simplifies the process by isolating the environment, making it easy to develop and test your blog locally.
In this guide, I’ll show you how to set up Jekyll in a Docker container on Windows, test it locally, and eventually publish it on GitHub Pages.
Prerequisites
- Docker installed on your system.
- A GitHub account for hosting your blog on GitHub Pages.
Create your Docker image
This will allow you to install Jekyll locally for testing and not have to worry Ruby dependencies. There is no official jekyll image thus I use the ruby official image from Docker Hub.
# Use the official Ruby image as the base image
FROM ruby:3.2

# Set an environment variable to avoid installation prompts during gem installation
ENV DEBIAN_FRONTEND=noninteractive

# Install dependencies
RUN apt-get update && \
    apt-get install -y \
    build-essential \
    tree \
    nodejs && \
    apt-get clean && \
    rm -rf /var/lib/apt/lists/*

# Install Jekyll and Bundler
RUN gem install jekyll bundler

# Create a directory for the Jekyll site
WORKDIR /srv/jekyll

# Expose the default Jekyll port
EXPOSE 4000

# By default, serve the Jekyll site
CMD ["/bin/bash"]
Now, build your Docker image with the following command:
docker build -t tech-blog .
Create a New Jekyll Site
Option 1: Host Terminal
This will create the tech-blog default content in the local host workspace and install all the template files for later to be mounted in /srv/jekyll.
docker run --rm --name tech-blog -v ${PWD}:/srv/jekyll tech-blog jekyll new .

# Use "--force" if you want to overwrite existent content, i.e.
# docker run --rm --name tech-blog -v ${PWD}:/srv/jekyll tech-blog jekyll new . --force
Option 2: Devcontainer
If you prefer to work within Visual Studio Code, you can use a devcontainer to create the same Jekyll site inside the container.
Here’s what my devcontainer.json looks like:
{
    "name": "Jekyll Tech Blog - Devcontainer",
    "image": "tech-blog",
    "workspaceFolder": "/srv/jekyll",

    "customizations": {
        "vscode": {
            "extensions": [
                "rebornix.ruby",
                "bungcip.better-toml",
                "streetsidesoftware.code-spell-checker"
            ]
        },
        "settings": {
            "terminal.integrated.shell.linux": "/bin/bash"
        }
    },

    "forwardPorts": [4000],

    "runArgs": [
      "--rm",
      "--name", "tech-blog"
    ],

    "mounts": [
      "source=${localWorkspaceFolder},target=/srv/jekyll,type=bind"
    ],

    "remoteUser": "root"
}
To create the Jekyll site inside the container:
- Use
F1orShift + Ctrl + Pin VS Code, and typeOpen in devcontainer. - Once the terminal is open inside the container, run:
jekyll new .

# Same as mention in the previous section use "--force" if content was created previously.
# jekyll new . --force
The previous steps will create the following files:
d----           9/15/2024  9:39 PM                _posts
d----           9/15/2024 10:41 PM                _site
d----            9/1/2024  2:19 AM                .jekyll-cache
-a---            9/1/2024  2:22 AM           2215 _config.yml
-a---            9/1/2024  2:11 AM            419 404.html
-a---            9/1/2024  2:11 AM            539 about.markdown
-a---            9/1/2024  2:11 AM           1309 Gemfile
-a---           9/15/2024 10:40 PM           4909 Gemfile.lock
-a---            9/1/2024  2:11 AM            175 index.markdown
-a---            9/7/2024  6:31 PM           3158 README.md
Test locally with the Jekyll Server
Option 1: Host Terminal
You can run the server in development mode, which will reload the page as you make changes.
Important Note: bundle install and jekyll serve need to be run together in one command to ensure Jekyll can find the necessary gems.
docker run --rm --name tech-blog -v ${PWD}:/srv/jekyll -p 4000:4000 tech-blog bash -c "bundle install && bundle exec jekyll serve --host 0.0.0.0 --livereload"
Then, open your web browser and paste the URL: http://localhost:4000.
Option 2: Docker compose
For simplicity, you can use a docker-compose.yml file like this:
services:
  tech-blog:
    build:
      context: .
      dockerfile: Dockerfile
    image: tech-blog
    container_name: tech-blog
    volumes:
      - ./:/srv/jekyll
    ports:
      - "4000:4000"
    command: >
      bash -c "bundle install &&
               bundle exec jekyll serve --host 0.0.0.0 --livereload"
    environment:
      - JEKYLL_ENV=development
To run in detached mode:
docker-compose up -d
Then, open your web browser and paste the URL: http://localhost:4000.
To remove and stop the containers:
docker-compose down
Option 3: Devcontainer
In the devcontainer, simply run:
bundle install
bundle exec jekyll serve --host 0.0.0.0 --livereload
In this case, use http://localhost:4001 instead of port 4000.
Deploy Your Blog on GitHub Pages
Once your blog is ready, you can deploy it on GitHub Pages for free! GitHub Pages is an excellent choice for hosting static sites like Jekyll blogs, offering free hosting, built-in integration with GitHub repositories, and automated builds whenever you push updates.
To get started, follow the official documentation on setting up GitHub Pages with Jekyll. Make sure your _config.yml is configured correctly and push your code to a GitHub repository.
Known Issues:
Some users have reported that gems are correctly installed within the Docker container when bundle install is run manually, but the container fails to find these gems when running the jekyll serve command directly via docker run.
Understanding the Problem: This issue likely occurs because the gems installed during an interactive session aren’t available when running Jekyll in a non-interactive command. This could be due to differences in environment variables, file permissions, or volume mapping issues in Docker.
Potential Workaround: One solution is to ensure that both bundle install and jekyll serve are run together in a single Docker command, as shown earlier in the post. Another option is to use Docker volumes to persist gem installations across sessions.
Final Thoughts
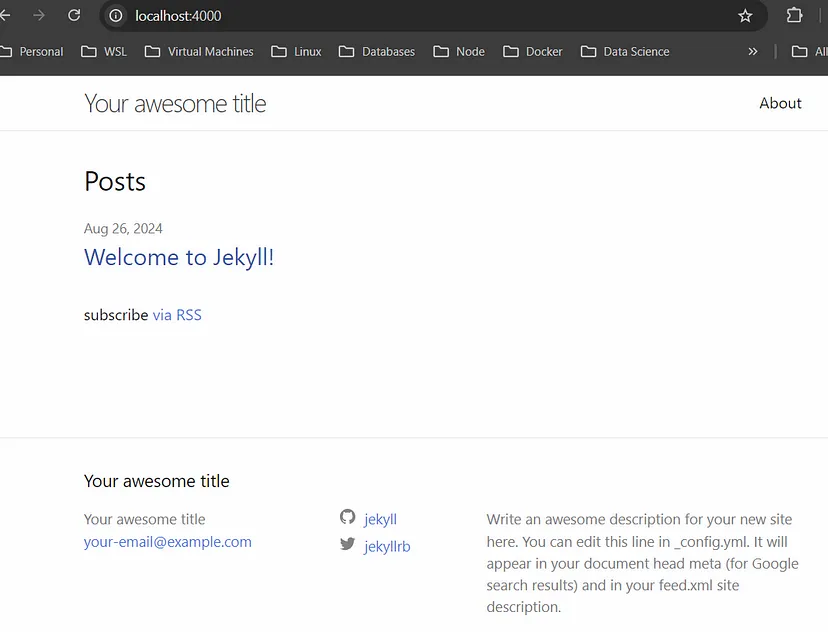
If everything worked fine this is how your site should look like:

Using Docker to create and manage your Jekyll blog ensures a consistent development environment, especially on Windows where Ruby dependencies can be challenging. Whether you choose to work from the terminal or through a devcontainer in VS Code, you now have the tools to set up, test, and deploy your personal blog with ease.
Happy blogging!